How To Make A Magnetic Homeschool Board + Easel | Free Plans
How To Make A Magnetic Homeschool Board + Easel | Free Plans. This article Creates a versatile magnetic homeschool board with diy wood easel plans free. This guide outlines the step-by-step process to craft a functional and educational tool for homeschooling, combining convenience and creativity in one project.
How To Make A Magnetic Homeschool Board + Easel | Free Plans? Crafting a magnetic homeschool chalkboard with an easel is simple using the provided free plans. This guide takes you through the step-by-step process, resulting in a functional and educational tool that combines convenience and creativity for effective homeschooling.
In the world of DIY and woodworking, creating functional and stylish accessories for your home is a rewarding endeavor. In this guide, we’ll show you not one, but two exciting projects to enhance your living space. Learn how to make a versatile magnetic homeschool schedule board with an easel, and discover the simple steps to craft affordable wooden knobs for your furniture. These projects are both practical and fun, offering a chance to flex your creative muscles.
The magnetic board with an easel is fantastic. Thanks to the free plans, it’s easy to create. A must-try for homeschoolers looking for useful and fun tools. I praise the guide’s free plans for creating a homeschool material magnetic board and easel. It’s a versatile tool for homeschooling that encourages interactive learning.
How To Make A Magnetic Homeschool Board + Easel | Free Plans/ Step-By-Step Guide
A magnetic white board for homeschool serves as a dynamic educational tool, engaging learners with interactive lessons. Paired with an easel, it becomes an adaptable accessory for a dedicated homeschool room, playroom, or any learning space.
Step 1
Gather Your Materials and Tools
Collect the following materials and tools to get started:
- Dry erase board (36×24 inches)
- 6 strong magnets
- 3 dry erase pens
- Dry eraser
- Plywood (for easel)
- Brad nails
- Woodworking tools
- Self-adhesive magnetic buttons
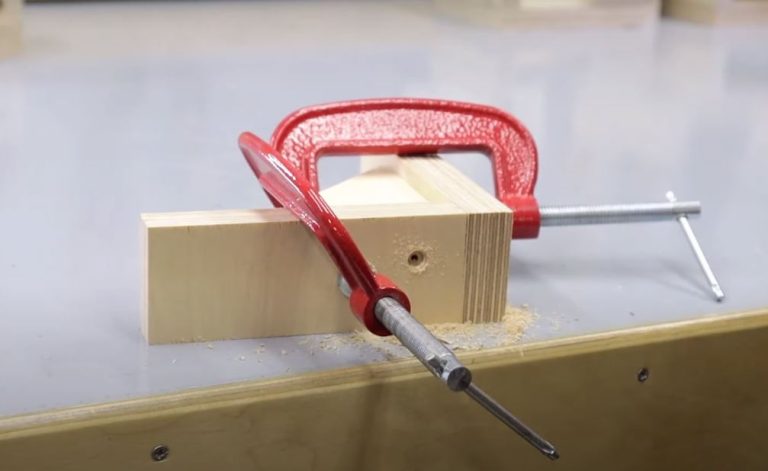
Step 2
Construct the Easel
Step two easel Create a foldable tabletop easel using a piece of plywood. Assemble the easel using brad nails and woodworking tools, ensuring it’s sturdy.
Step 3
Attach the Magnetic Dry Erase Board
Securely mount the dry erase board onto the easel using screws or brackets.
Step 4
Add Magnetic Functionality
Apply self-adhesive magnetic buttons to the back of the dry erase board. These buttons allow you to attach magnets and learning materials easily.
Step 5
Set Up Your Homeschool Space
Position the magnetic homeschool board + easel in your chosen area. Adjust the height for optimal comfort and accessibility.
Utilizing Your Magnetic Homeschool Board + Easel
Maximize the functionality of your board and easel combination:
- Interactive Lessons
- Display charts, diagrams, and visual aids for engaging lessons.
- Spelling and Math
- Use magnetic letters and numbers for hands-on learning.
- Geography Lessons
- Attach a world map and use magnets to mark countries and landmarks.
- Art and Creativity
- Utilize the whiteboard surface for drawing and creative projects.
Crafting Affordable Wooden Knobs Quick and Easy
The Beauty of DIY Wooden Knobs
Wooden knobs are a small detail that can transform the look of furniture. Crafting your own knobs allows for customization and cost savings.
Crafting Wooden Knobs/Step by Step
Step 1
Gather Your Materials and Tools
Here’s what you’ll need,
- Plywood
- Hole saw
- Sandpaper
- Wood glue
- Wooden dowel or stick
- Drill
- Saw
Step 2
Cut the Knobs
Using a hole saw, cut out the desired number of wooden knobs from the plywood.
Step 3
Sand the Knobs
Sand the edges and surfaces of the knobs to ensure a smooth finish.
Step 4
Create the Base
Cut small pieces from a wooden dowel or stick to serve as the base of the knobs.
Step 5
Attach the Knobs to the Base
Apply wood glue to the base and attach the knobs securely.
Conclusion
To sum up, How To Make A Magnetic Homeschool Board + Easel | Free Plans.Both the magnetic homeschool board + easel and DIY wooden knobs are practical and creative projects that can enhance your living space. The homeschool board offers an engaging way to teach and learn, while the wooden knobs add a personal touch to your furniture.
By following the step-by-step guides and utilizing the provided free plans, you can easily create these functional and stylish accessories. Whether you’re enhancing your homeschool environment or updating your furniture, these projects are sure to add value to your home.
Frequently Asked Questions
Q. What materials are required to construct the magnetic homeschool board and easel using the provided free plans?
A. The required materials often include a wooden board, magnetic sheet, hinges, screws, and basic tools like a saw, drill, and screwdriver.
Q. How do the magnetic properties of the board enhance homeschooling activities?
A. The magnetic board allows for interactive learning by enabling the attachment of various educational materials like visual aids, charts, and magnets, enhancing engagement and teaching versatility.
Q. Are the provided free plans suitable for individuals with limited woodworking experience?
A. Yes, indeed. The free plans are often designed to be beginner-friendly, offering clear instructions and step-by-step guidance to help those with limited woodworking experience successfully create the magnetic homeschool board and easel.