How I Sharpen A Plane Blade Till It Is Razor Sharp
The article, How I Sharpen a Plane Blade Till It Is Razor Sharp depicts the step-by-step process of achieving a razor-sharp edge for your plane blade. Some effective techniques and essential tips to sharpen your hand plane blade to perfection, enhancing woodworking precision and efficiency!
How I Sharpen a Plane Blade Till It Is Razor Sharp? hand plane sharpening can achieve a razor-sharp plane blade that involves meticulous steps. Begin with flattening the back, progressing through grits for the bevel, and refining on a honing guide. Stropping adds the finishing touch, ensuring woodworking precision at its finest.
How to sharpen a hand plane? Woodworking is a craft that demands precision and attention to detail, and one of the fundamental tools in a woodworker’s arsenal is the hand plane. A well-sharpened plane blade can make all the difference between rough, uneven surfaces and smooth, precise cuts. In this guide, I’ll take you through the process of how I sharpen a plane blade until it reaches razor-sharp perfection, using techniques that can elevate your woodworking projects to a new level.
This walkthrough transformed my plane blade sharpening. Clear instructions made the process hassle-free. Achieving razor-sharp edges elevated my woodworking game. A must-read for wood enthusiasts seeking top-notch results.
How I Sharpen a Plane Blade Till It Is Razor Sharp/Step-By-Step Process
A sharp hand plane blades is essential for achieving clean cuts, reducing tear-out, and ensuring accurate measurements in woodworking projects. Dull blades can cause frustration and compromise the quality of your work. By following these steps, you can sharpening hand plane to razor-sharp precision.
Gathering Your Sharpening Tools
Before you begin sharpening your plane blade, it’s crucial to gather the necessary tools.
- A honing guide to maintain the proper angle during sharpening.
- Various grit sharpening stones or sandpaper for different stages of sharpening.
- A strop with polishing compound for the final touch.
- A ruler for the ruler trick (more on that later).
Step-by-Step Guide to Sharpening a Plane Blade
1. Prepare the Blade
Start by removing the blade from your hand plane. Inspect the blade for any nicks or chips. If you find any, use a coarse grit stone to grind away those imperfections before proceeding.
2. Establish the Primary Bevel
Secure the blade in the honing guide and set it to the desired bevel angle, typically around 25 to 30 degrees. This primary bevel forms the cutting edge of the blade.
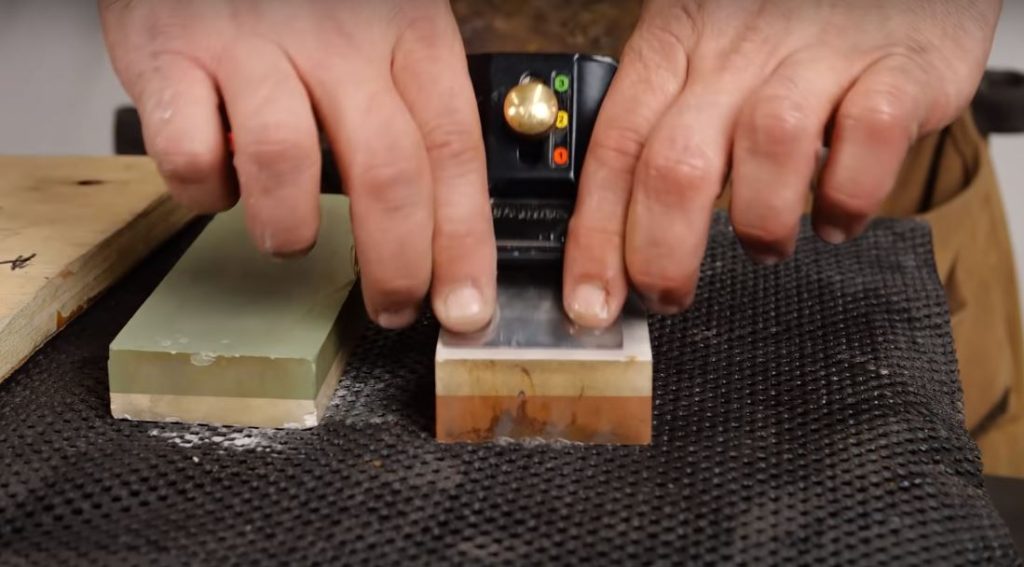
3. Hone the Edge
Begin with a medium grit stone (around 400 grit) and apply honing oil or water to the stone’s surface. Use smooth, controlled strokes to hone the edge of the blade, making sure to maintain the chosen bevel angle. Repeat this process until you feel a slight burr on the opposite side of the edge.
4. Create a Micro Bevel

To strengthen the edge and remove the burr, slightly increase the bevel angle by a few degrees (usually 1 to 5 degrees) and make a few light strokes on the stone. This creates a micro bevel that will enhance the blade’s durability.
5. Polish with Finer Grits
Progressively move to finer grit stones (800 to 1000 grit) to further refine and polish the blade’s edge. Make sure to remove any burrs along the way.
6. Strop the Blade
After honing, use a leather strop charged with polishing compound to further refine the blade’s edge. This step helps to achieve the razor-sharp finish you’re aiming for.
7. The Ruler Trick
To ensure the back of the blade is flat and making full contact with the wood surface, use the ruler trick. Place a ruler flat on the stone and rest the back of the blade against it. This helps in achieving a flat back, which is crucial for optimal performance.
8. Reassemble the Plane
With your plane blade now sharpened to perfection, reassemble your hand plane, making sure the blade is properly aligned and securely fastened.
9. Test the Sharpness
Before putting your sharpened plane blade to work, perform a test on a scrap piece of wood. The blade should effortlessly shave off thin shavings, leaving a smooth surface behind.
Conclusion
The article, How I Sharpen a Plane Blade Till It Is Razor Sharp depicts sharpening a plane blade to razor-sharp perfection might seem like a daunting task, but with the right techniques and tools, it becomes an essential skill in your woodworking journey. A sharp hand plane blade enhances the quality of your work and makes woodworking a more enjoyable and rewarding experience. By following the steps outlined in this guide, you’ll be well on your way to achieving precise, clean cuts and taking your woodworking projects to the next level. Remember, practice makes perfect, so don’t hesitate to refine your skills and techniques over time.
Frequently Asked Questions
Q. What tools are essential for sharpening a plane blade?
A. To achieve a razor-sharp edge, you’ll need sharpening stones of varying grits, a honing guide, a flattening plate, and a strop. These tools ensure a comprehensive and effective sharpening process.
Q. How do I know when the plane blade is truly razor sharp?
A. A truly sharp blade will easily shave thin strips of wood without undue effort. You’ll also notice a high level of precision in the woodwork, with reduced tear-out and smoother cuts.
Q. Can this method be applied to different types of plane blades?
A. Yes, the sharpening method outlined is suitable for various plane blades, regardless of size or brand. Adjustments to the process might be needed based on the specific blade dimensions, but the general principles remain the same.